Lovely girls, Allie and Jasmine, were zombies for this photoshoot, which is perfect inspiration for Halloween. I was in love with the shoot and asked if they'd share their secrets in a DIY tutorial.
Allie's mom, Amy, is the photographer. She added her zombie photography tips at the end so you can do your own amazing shoot. She's great -- here's her website.
Enjoy the tutorial!
Outfits: Getting your outfit together is the easiest part of turning yourself into a beautiful zombie. We began by going through old costumes, clothes, and rags. First find a base -- whether it is a spandex leotard or a tight shirt and shorts. Next rip, rip, rip. We ripped almost everything we had on. You can use old button up shirts if you rip off the sleeves and shred the bottom, or just tie in knots to hold together pieces of the cloth. Next, layer! We had about 5-7 layers of ripped skirts, dress shirts, vests, scarfs, belts, jewelry, dresses, etc. Ripping and layering are the keys to making it look great.
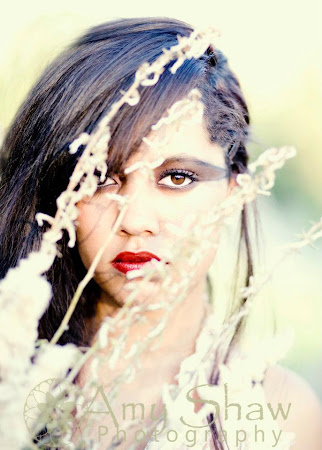 | 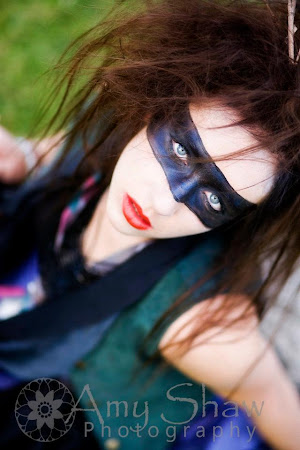 | Make Up: We began by going online and looking up zombie makeup, but we didn't like anything we found because it was to bloody and evil. So, we made our own look. First we started with a light base coating to make our skin appear a few shades lighter then it was, however you dont want to do this too heavily because it can wash out your face, unless your going for the truly dead look. Next, we played up our eyes. Remember, more is better! We started with one color over the whole eye, then begin filling in with other colors, bringing the eye shadow up high and out as far as you want. We also added eye shadow underneath our eyes to make it more dramatic. Then we used thick black eyeliner to really bring out our eyes, (thick is good). Finish with a lot of mascara and red red lips. Hair: Jasmine began by clipping her hair up in three ponytails on top of her head, she then ratted (she does have extremely long hair so it looked great). After she had ratted it all she tucked a few pieces up into the pony tail but left most of it ratted (it needs to be ratted enough so you cannot see the elastics and hold its shape). Then she found a few (5 or 6) sticks and just clipped them in wherever they looked best. Allie began by curling her hair, then clipped all of her hair to one side with bobby pins. After clipping it, she ratted lightly (this may work better if your hair does not hold curl). Mostly make it messy, but keep its shape. Hair: Jasmine began by clipping her hair up in three ponytails on top of her head, she then ratted (she does have extremely long hair so it looked great). After she had ratted it all she tucked a few pieces up into the pony tail but left most of it ratted (it needs to be ratted enough so you cannot see the elastics and hold its shape). Then she found a few (5 or 6) sticks and just clipped them in wherever they looked best. Allie began by curling her hair, then clipped all of her hair to one side with bobby pins. After clipping it, she ratted lightly (this may work better if your hair does not hold curl). Mostly make it messy, but keep its shape.
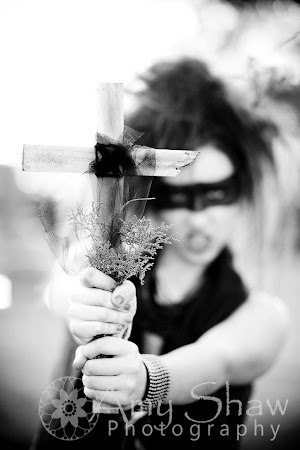 | 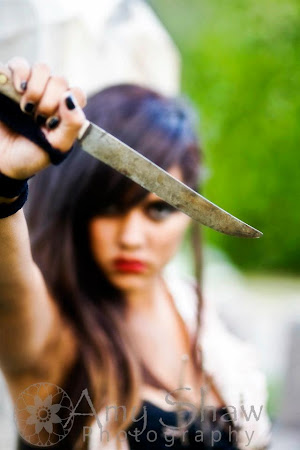 | |
Accessories: Bring a few accessories with you. We brought two sticks and with yarn made it into a cross. We used my brothers ninja cape. And a creepy doll works and looks good too! Oh and don't forget your knives!
 Photoshoot: We choose to photograph our zombies in a quiet corner of a local cemetery. Some cemeteries won't allow you in but if you show respect and don't climb all over the stones or get near someone who is there to visit a loved one you should be okay. Old houses would also be a great place to shoot--you are looking for anything broken and run down. When taking your pictures try and set your f -stop to as low a setting as possible like 2.0 or 1.8 (if you have it). If you can't control your f-stops but have a camera with options choose the "portrait" setting. You want to get the background to be as burry as possible. Also, play around with angles. Lie on the grass and shoot own low, like the one I took of the girls crawling on the grass. Tilt your camera, but don't overdo it. I've noticed that a little tilt goes a long way. Or stand up on a bench and shoot down on your subject. Most of all just have fun and use your imagination.
xoxo Allie, Jasmine, and Amy.


 Hair: Jasmine began by clipping her hair up in three ponytails on top of her head, she then ratted (she does have extremely long hair so it looked great). After she had ratted it all she tucked a few pieces up into the pony tail but left most of it ratted (it needs to be ratted enough so you cannot see the elastics and hold its shape). Then she found a few (5 or 6) sticks and just clipped them in wherever they looked best. Allie began by curling her hair, then clipped all of her hair to one side with bobby pins. After clipping it, she ratted lightly (this may work better if your hair does not hold curl). Mostly make it messy, but keep its shape.

 Photoshoot: We choose to photograph our zombies in a quiet corner of a local cemetery. Some cemeteries won't allow you in but if you show respect and don't climb all over the stones or get near someone who is there to visit a loved one you should be okay. Old houses would also be a great place to shoot--you are looking for anything broken and run down. When taking your pictures try and set your f -stop to as low a setting as possible like 2.0 or 1.8 (if you have it). If you can't control your f-stops but have a camera with options choose the "portrait" setting. You want to get the background to be as burry as possible. Also, play around with angles. Lie on the grass and shoot own low, like the one I took of the girls crawling on the grass. Tilt your camera, but don't overdo it. I've noticed that a little tilt goes a long way. Or stand up on a bench and shoot down on your subject. Most of all just have fun and use your imagination.
No comments:
Post a Comment